Chimney Cap Damage Before Winter: Critical Guide for Minnesota Homeowners
Your chimney is the most exposed part of your home. It rises above the roofline, completely unprotected from the elements, facing relentless weather stress all year long. At the very top, one crucial component protects everything below it: the chimney cap.
A functioning chimney cap is your home’s first line of defense against water intrusion, animal entry, and debris accumulation. But if that cap is damaged or missing, your entire chimney system becomes vulnerable—and Minnesota’s harsh freeze-thaw cycles will exploit that vulnerability ruthlessly.
Understanding what chimney caps do, why they fail, and what warning signs demand immediate attention can save your Minneapolis or Bloomington home from tens of thousands of dollars in water damage and structural repairs.
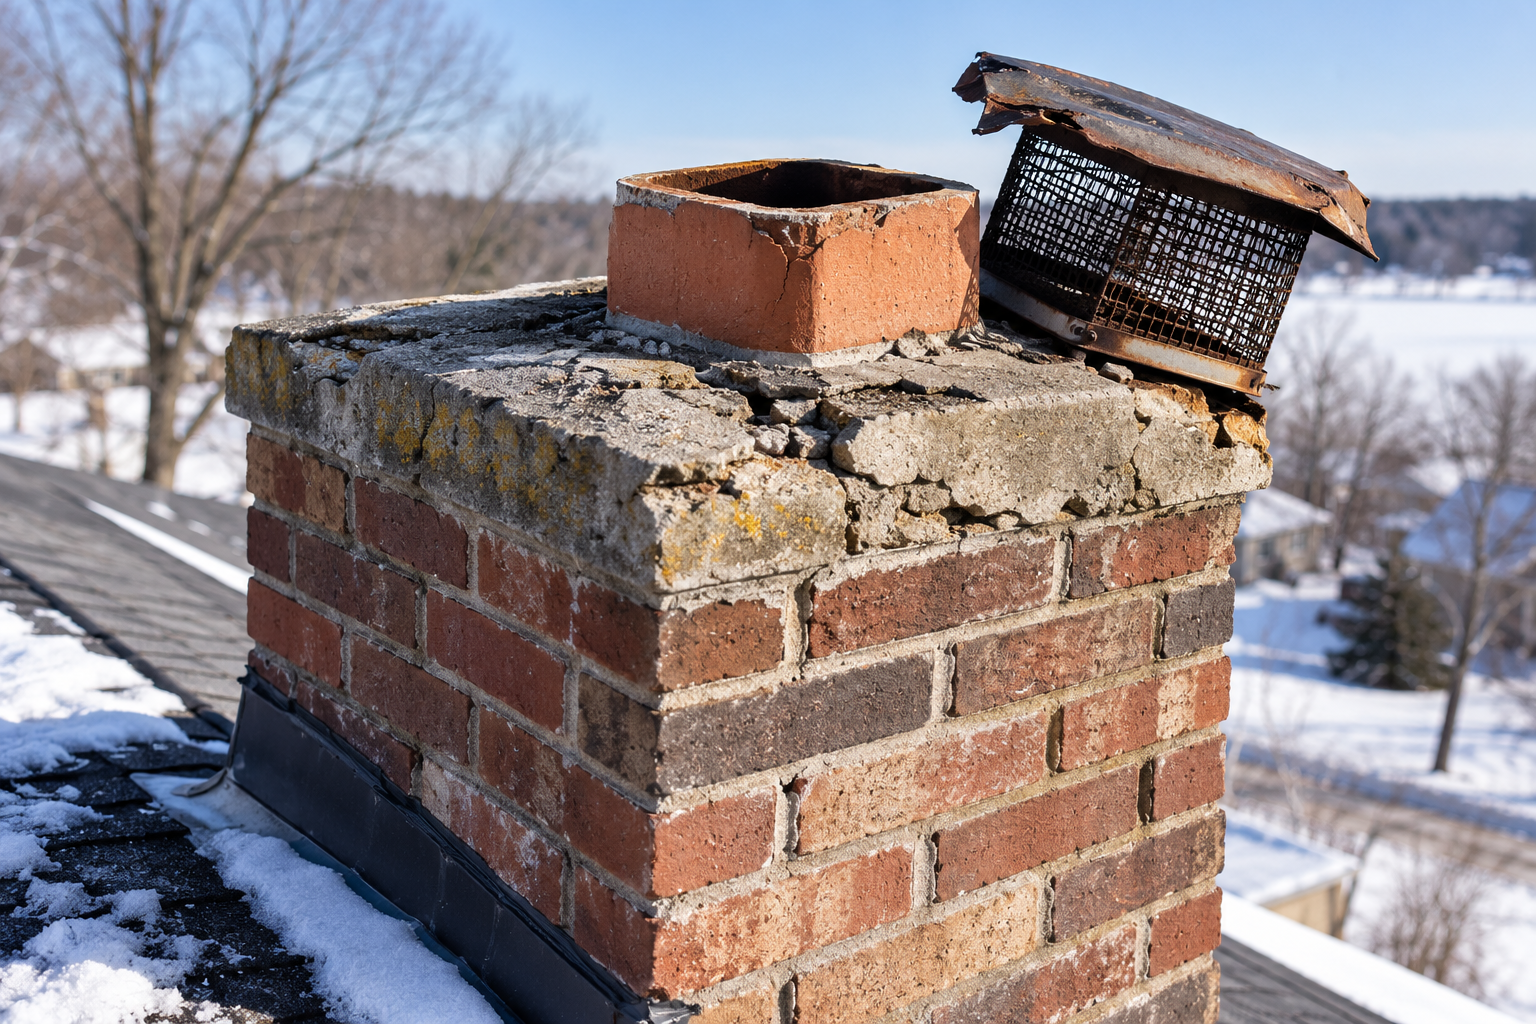
What Does a Chimney Cap Actually Do?
Chimney caps are simple in design but critical in function. A chimney cap is a metal covering that sits on top of your chimney, directly over the flue opening.
Primary Functions of a Chimney Cap
Prevents water from entering directly: Rain and snowmelt won’t run straight down into your flue opening. The cap directs water outward and downward.
Stops animals from entering: Birds, raccoons, squirrels, and other creatures can’t access your chimney. Animal nests in chimneys create blockages and fire hazards.
Prevents debris accumulation: Leaves, twigs, and other debris won’t fall directly into the flue. Accumulation creates blockages affecting fireplace function and safety.
Reduces downdrafts: Wind flowing across the roofline creates suction that pulls smoke into the home. A properly designed cap reduces this effect.
Protects the chimney interior: The cap shield prevents excessive weathering of the flue top and interior components.
A functioning chimney cap is absolutely essential. Without one, your chimney becomes a direct pathway for water and debris into your home’s most vulnerable systems.
Why Minnesota’s Climate Destroys Chimney Caps So Quickly
Minnesota homeowners face unique challenges that damage chimney caps far faster than in milder climates. Understanding these factors explains why cap maintenance is critical.
Freeze-Thaw Stress on Metal Caps
Minnesota’s temperature swings create mechanical stress on metal caps that accelerates deterioration:
- Metal expands when temperatures rise
- Metal contracts when temperatures drop
- Repeated expansion and contraction loosens fasteners
- Over dozens of cycles each winter, fasteners fail
- The cap shifts, separates, or falls off
Additionally, water that enters gaps between the cap and chimney freezes, expands, and creates pressure that forces the cap upward. By spring, many caps are loose or partially separated.
Rust and Corrosion From Salt Exposure
Road salt and chemical de-icers splash onto roofs near roads and onto chimneys. Salt accelerates corrosion of metal caps:
- Steel caps rust rapidly when exposed to salt
- Rust creates holes and weakens structural integrity
- Aluminum caps corrode and become brittle
- Copper caps develop patina (which actually provides some protection)
Homes near roads in Minneapolis and Bloomington often experience accelerated cap deterioration from salt exposure.
Heavy Snow and Ice Loads
Minnesota’s heavy winter snow creates weight stress on chimneys and caps:
- Snow and ice accumulate on the cap
- Weight pushes the cap downward or shifts it sideways
- Wind forces on loaded caps create additional stress
- Fasteners fail under repeated stress
- The cap separates or deteriorates
UV and Weather Exposure
The cap faces relentless exposure to sun, wind, rain, and temperature extremes:
- UV radiation degrades sealants around the cap
- Wind pressure constantly stresses fasteners
- Rain constantly tests the seal between cap and chimney
- Temperature swings stress materials repeatedly
Unlike protected parts of your home, the cap has no shelter from any element.
Warning Signs Your Chimney Cap Is Damaged or Missing
Identifying cap problems early is essential before water damage begins. Here’s what to watch for:
Visible Signs You Can Observe From Ground Level
Missing cap entirely: The most obvious sign. Looking at your chimney top, you should see a cap. If you don’t, that’s a critical problem requiring immediate attention.
Visibly bent or tilted cap: The cap should sit level on top of the chimney. If it’s bent, tilted, or appears misaligned, it’s not functioning properly.
Rust or corrosion on the cap: Orange or brown staining on steel indicates rust. Heavy corrosion weakens the cap structure.
Visible gaps between cap and chimney: There should be no daylight visible between the cap and the chimney top. Gaps allow water entry.
Damaged or missing fasteners: Look for loose bolts or straps that hold the cap in place. Missing fasteners mean the cap is no longer secure.
Debris accumulation on the cap: Leaves, twigs, or other debris piling up indicates water isn’t shedding properly.
Cracked or damaged metal: Any visible cracks, holes, or tears in the cap indicate structural failure.
Animal damage: Scratches, bent areas, or evidence of animals attempting entry suggests the cap is failing to keep them out.
Interior Signs of Cap Problems
Water stains on the ceiling below the chimney: Water running down inside the chimney indicates the cap isn’t preventing water entry from above.
Water pooling in the firebox or smoke chamber: Direct evidence water is entering the flue system.
Animal sounds or evidence of nests: Sounds of animals in the chimney or visible nests indicate the cap isn’t preventing entry.
Debris falling into the fireplace: Leaves, twigs, or other debris accumulating in the fireplace or smoke chamber means external debris is entering the flue.
Unusual drafting problems: If your fireplace suddenly drafts poorly or produces excessive smoke, cap failure may be redirecting airflow.
Musty or moldy odors: Persistent moisture entering through a failed cap can create odors indicating hidden moisture accumulation.
How Cap Damage Triggers Water Intrusion and Structural Damage
A damaged chimney cap seems like a localized problem. In reality, it cascades into widespread structural damage.
The Water Damage Progression
Week 1: Rain or snowmelt enters the flue opening through a missing or damaged cap. Water flows down inside the chimney.
Week 2-3: Water runs down the interior flue, may enter the smoke chamber, and reaches the firebox. Interior stains become visible. Water also travels into the chimney structure itself (the brick and mortar between the flue and exterior).
Week 3-4: Water travels outside the flue but inside the chimney structure—into the space between the flue liner and the exterior masonry. This water travels behind bricks.
Month 2: Water from inside the chimney structure seeps into adjacent wall cavities. Insulation begins absorbing moisture. Hidden water damage is developing in spaces you can’t see.
Month 2-3 (Freeze-Thaw Cycles Accelerate): Water inside the chimney structure and walls freezes, expands, and causes damage. Freeze-thaw cycles repeat repeatedly through winter, progressively destroying brick, mortar, and wood framing.
Month 3-4: Hidden water damage becomes apparent. Stains appear on ceilings or walls beyond just the chimney area. Insulation is saturated. Mold has developed. Structural wood has absorbed moisture.
Month 4-6: By spring, extensive water damage is evident. Repair costs have escalated dramatically. The problem that could have been prevented with a $300-$600 cap replacement in October has created $10,000-$25,000+ in remediation needs.
Cost Comparison: Cap Repair vs. Water Damage Remediation
The financial logic for addressing cap problems immediately is overwhelming.
Professional Chimney Cap Replacement Cost
- Professional inspection and assessment: $150-$400
- Chimney cap replacement: $300-$800 (steel or aluminum)
- Premium copper cap (more durable): $600-$1,200
- Installation labor: Included
- Follow-up inspection: Included
Total professional cap replacement: $450-$1,400
Water Damage Remediation Cost (Result of Delayed Cap Repair)
If cap failure allows water damage to develop:
- Interior water damage repair: $1,000-$5,000
- Insulation replacement: $500-$2,000
- Mold remediation: $1,000-$5,000+
- Structural wood replacement: $2,000-$10,000+
- Chimney flue liner damage: $500-$2,000
- Roof repairs from interior damage: $1,000-$3,000
- Drywall and plaster replacement: $500-$2,000
Total remediation: $6,500-$29,000+
A $1,000 cap replacement in October prevents a $15,000+ emergency in spring. The ROI is immediate and substantial.
Why DIY Cap Replacement Isn’t Recommended
Many homeowners are tempted to purchase an inexpensive cap online and install it themselves. This typically ends badly.
Problems With DIY Cap Replacement
Fall hazards: Working at heights without proper safety equipment is one of the most dangerous home tasks.
Installation mistakes: Improper installation means water still enters despite having a new cap. Common mistakes include incorrect sizing, improper fastening, or sealed gaps that trap moisture inside.
Poor cap quality: Cheap online caps often fit poorly, rust quickly, or don’t shed water properly.
Warranty void: If improper installation causes problems, you have no recourse.
Hidden damage not addressed: A professional assessment identifies water damage that needs repair before a new cap is installed.
Structural issues missed: Professional contractors evaluate whether the chimney top (the crown) is properly positioned for the new cap.
Professional installation ensures the cap functions correctly and lasts years rather than months.
Professional Cap Inspection and Replacement Process
When you contact a professional about chimney cap problems, here’s what happens.
The Inspection Phase
A professional will:
- Examine your current cap (or note if it’s missing) from ground level initially
- Use proper safety equipment to access the chimney top and inspect closely
- Assess cap condition, fastening, and whether it’s properly positioned
- Evaluate the chimney top (crown) condition and position
- Check for water stains or damage inside the chimney
- Determine what cap size and type is appropriate
- Assess whether water has penetrated the chimney structure
Assessment and Recommendation
Based on inspection, the professional recommends:
- Simple replacement: If the cap has simply reached end of life, replacement with a quality new cap
- Repair and replacement: If water damage is present, remediation may be needed alongside cap replacement
- Cap upgrade: If your current cap design isn’t working well, a better design may be recommended
- Material selection: Steel, aluminum, or premium copper caps each have different durability and cost
- Timeline: Whether work is urgent or can be scheduled for convenience
Installation and Follow-Up
Professional installation includes:
- Removing the old cap (if present)
- Cleaning the chimney top
- Installing the new cap with proper fastening and sealing
- Ensuring water sheds properly
- Inspecting interior flue to confirm no water damage
- Follow-up to ensure cap functions correctly
Why Autumn Is Ideal for Cap Replacement in Minnesota
October and early November are optimal for chimney cap work.
Weather Advantages
Autumn temperatures are moderate—neither too hot for roofing sealants nor too cold for proper curing. Weather is typically dry, allowing clean installation and proper sealing. This isn’t true in winter when work is difficult and dangerous.
Prevention Through Freeze-Thaw Season
Cap replacement completed in October provides complete protection through winter’s most destructive months. Every freeze-thaw cycle finds a functioning cap in place. Each snowfall is shed properly rather than entering the flue.
Application delayed until spring means the entire winter has already passed with a failed cap allowing water entry.
Professional Availability
Contractors have better availability in fall. Winter and spring are peak emergency seasons when contractors are overwhelmed. You’re more likely to get quality workmanship in good conditions rather than rushed service during busy seasons.
Maintaining Your New Chimney Cap for Long-Term Protection
Once a new cap is installed, simple maintenance extends its life.
Annual Inspection
During your annual chimney inspection (recommended before fireplace season), professionals can:
- Verify the cap is properly positioned and fastened
- Look for early signs of rust or corrosion
- Confirm proper water shedding
- Identify any damage requiring attention
Keep Debris Clear
Remove leaves, twigs, and debris from the cap top. Accumulated debris can cause water pooling and accelerate deterioration.
Monitor for Changes
Watch for visible rust, tilting, or gaps developing. Early detection allows repairs before water damage occurs.
Plan for Replacement
Quality steel caps typically last 10-15 years. Aluminum caps last 5-10 years. Premium copper caps last 20-30+ years. Plan for eventual replacement rather than being surprised by sudden failure.
Services and Service Areas in Minnesota
We proudly provide chimney repair MN, including:
Buffalo, MNAnnandale, MNMonticello, MNWaverly, MNClearwater, MN
Our chimney and fireplace repair services include:
Frequently Asked Questions
What exactly is a chimney cap and what does it do?
A chimney cap is a metal covering that sits on top of your chimney over the flue opening. It prevents water from entering directly from above, stops animals from accessing the chimney, prevents debris from falling into the flue, and reduces downdrafts. A functioning cap is essential for chimney system integrity.
Why do chimney caps fail so quickly in Minnesota?
Minnesota’s freeze-thaw cycles, heavy snow loads, salt spray exposure, and extreme temperature swings all accelerate cap deterioration. Metal expands and contracts repeatedly, fasteners loosen, water freezes and creates pressure, and corrosion from salt exposure weakens the structure.
How do I know if my chimney cap is damaged or missing?
From ground level, look to see if a cap is present on top of your chimney. If visible, check whether it’s level, rusted, cracked, or has visible gaps. Interior signs include water stains in the firebox, animal sounds in the chimney, or debris falling into the fireplace.
What happens if my chimney has no cap at all?
Water runs directly down the flue into your fireplace. Animals can enter the chimney. Debris accumulates. Draft problems develop. Water intrusion begins immediately. This is a critical problem requiring urgent professional attention.
Can I replace my chimney cap myself?
Not safely. Working at heights without proper equipment is dangerous. DIY installation often results in improper positioning that allows water entry despite having a cap. Professional installation ensures proper fit, fastening, and function.
How much does professional chimney cap replacement cost?
Professional cap replacement typically costs $450-$1,400 depending on cap material and chimney characteristics. This is far less than water damage remediation costs ($15,000-$30,000+).
What's the best type of chimney cap material?
Steel is affordable but requires replacement every 10-15 years. Aluminum is less durable (5-10 years). Copper is premium, most durable (20-30+ years), and most expensive. For Minnesota’s harsh climate, copper provides the best long-term value despite higher initial cost.
What causes rust on chimney caps?
Steel caps rust from exposure to moisture and oxygen. Salt spray from roads accelerates rust. Aluminum caps don’t rust but do corrode. Copper caps develop protective patina over time.
Should I have my chimney cap inspected even if it looks fine?
Yes. Professional inspection identifies problems you can’t see—fasteners working loose, corrosion beginning, water penetrating around the seal. Annual inspection before fireplace season catches problems early.
How long does a chimney cap typically last?
Steel caps last 10-15 years. Aluminum caps last 5-10 years. Premium copper caps last 20-30+ years. Minnesota’s harsh climate shortens these timelines compared to milder regions.
Can a damaged cap cause health problems?
Indirectly. Water from a failed cap can cause mold growth, which triggers respiratory issues. Animals entering through a failed cap can carry diseases. Water damage affects indoor air quality. These are reasons to address cap problems urgently.
What should I do if I discover water damage from flashing failure?
Document the damage with photos, contact your insurance agent to report the claim, and contact a professional to assess the extent of damage and recommend repairs.
Can a damaged roof around the chimney cause flashing problems?
Yes. If roof shingles near the chimney are damaged, missing, or deteriorated, water can run under the shingles and enter behind flashing. Roof shingle condition is important to flashing effectiveness.
What's the best time of year to replace a chimney cap in Minnesota?
August through October is optimal. Temperatures allow proper installation and sealing. You prevent freeze-thaw damage through the entire winter. Professional availability is better before winter rushes.
Does homeowner's insurance cover chimney cap replacement?
Usually not. Cap replacement is typically considered maintenance. However, water damage caused by a failed cap may be covered depending on your specific policy. Contact your insurance agent, but don’t delay professional evaluation awaiting insurance determination.
What if water damage has already developed from a failed cap?
Professional assessment determines the extent of damage. Repairs may include drywall replacement, insulation replacement, mold remediation, and structural evaluation. A new cap must be installed to stop ongoing water entry. Water damage remediation is expensive, which is why cap maintenance is critical prevention.
Can I use waterproof sealant around a damaged cap to fix it temporarily?
Temporary sealants may slow water entry briefly but won’t fix the underlying problem. Water will continue entering through gaps and cracks. The cap eventually fails entirely. Professional replacement is the only lasting solution.